Extra Features
Last updated
Last updated
In previous pages, you've walked through how to make a very basic webcomic website using comic_git. However, comic_git supports many other features that are not described in the basic instructions. Some of these features were described in when the comic_info.ini file was described. More complex features are described below.
The default layout and features of comic_git are intended to appeal to as many people as possible, but if you really get into customizing your website to fit your needs, you'll probably want to modify the pages themselves, or even add extra pages. This is where themes come in.
comic_git has a default theme, which can be found at /your_content/themes/default/. Initially, this folder contains just the stylesheet.css file in the css directory, which defines things like the colors and fonts of your website. However, this folder can be used to make even bigger changes to your website.
Let's say you wanted to edit the layout of your comic pages. Perhaps to do something like... I don't know... put a Hypno Toad gif between the Previous and Next links. Whatever, man, it's your web comic. Do what you want.
To do this, you'll want to find the template file for this page in /src/templates/. Then find the file you want to change (for comic pages it's comic.tpl, for the archive page it's archive.tpl, etc). Create a templates folder in the /your_content/themes/default/ directory, and copy that file there. You can then make any edits to that file, and it will override the file in /src/templates/. You can edit this file in any text editor.
This file is what's called a file. Jinja is an incredibly powerful tool that lets you create files that can be converted into HTML files using for loops, if/else blocks, and variables acting as placeholders for values passed in by the comic_git script. I've done my best to comment the existing template files in the src/templates directory to help clarify how to use Jinja for anyone curious enough to go poking around.
I recommend using Jinja templates whenever you're making pages for your website, as they provide a lot of flexibility and power that you won't get from normal HTML pages. For more information on the details of Jinja and the variables available to your templates when they're built, see Advanced Tips.
However, if you prefer to not mess with Jinja templates for your first attempt at editing your website, that's fine, too! comic_git also allows plain HTML files. Instead of creating a *.tpl file in the /your_content/themes/default/templates/ directory, make an *.html file instead. The easiest way to start is to go to the page you want to edit in your web browser, right click on the page, go to "View Source", and just copy all that text into the *.html file.
Creating HTML files is NOT recommended for most pages that have content that will change as you update the rest of your website, like comic pages, the archive page, and tagged pages. Jinja template files are required to keep these pages up-to-date whenever the website is built. However, using HTML files will usually be just fine when adding new pages to your website, as described in the next section.
Adding new pages to your website beyond what's already provided by comic_git is very similar to editing existing pages, with a few small changes. You'll usually want to start with copying an existing template or HTML file to use as a starting point, but give it its own unique name. You will also want to put it in the /your_content/themes/default/templates/ directory. Then, you will need to add the file name to the [Pages] section of your comic_info.ini file. For example, if you're creating a cast.html file, you should add the line cast = Cast Page.
If you need to create a large number of pages that can change every time the website is built, like a cast page for each character, you may want to make use of the build_other_pages code hook. See Code Hooks for more information.
You may eventually want to not rely on just editing the default theme, but rather create your own. The benefit of creating your own theme is that you can easily switch between themes without having to delete or edit existing files.
To do so, just copy the default theme directory, and edit the contents in there as described in the previous two sections. Then, add a "Theme" option in the "Comic Settings" section of your comic_info.ini file, with a value matching the name of the theme directory. An example "geocities" theme has already been created, and you can check it out by setting your theme to "geocities" and rebuilding your webpage.
Themes can also be shared between different comic_git powered websites! As long as all the files required for a theme to work are somewhere in the theme directory, you can just send the whole theme directory to a friend who's also using comic_git, and they can try out your theme on their own site!
Have you ever shared a link on Facebook, Twitter, Discord, etc. and a preview of the page appeared below the link? You can do the same thing with your comic!
A preview image is the small image that shows up alongside the title and description of a link that shows up as part of the link preview, usually 100px wide and 100px high. To create your own preview image, create a file named preview_image.png and put it in the your_content/images/ directory. If your preview image's dimensions are different than 100px by 100px, you must edit the following lines in the src/templates/base.tpl file (preferably by editing the default Theme as described above):
Many users prefer to read their web comics through an RSS feed. Building an RSS feed as part of publishing your comic is simple.
Look for the [RSS Feed] section in your comic_info.ini file. It should look something like below:
Set Build RSS Feed to True. Fill out all the other fields as needed:
Description: A short description, no more than a few sentences. This will appear underneath the name of your comic in RSS feed readers.
Image: The relative path to an image you want to represent your website. A banner can do, but something small around 100x100 px is best.
Image width: The width of the image defined in the Image option above.
Image height: The height of the image defined in the Image option above.
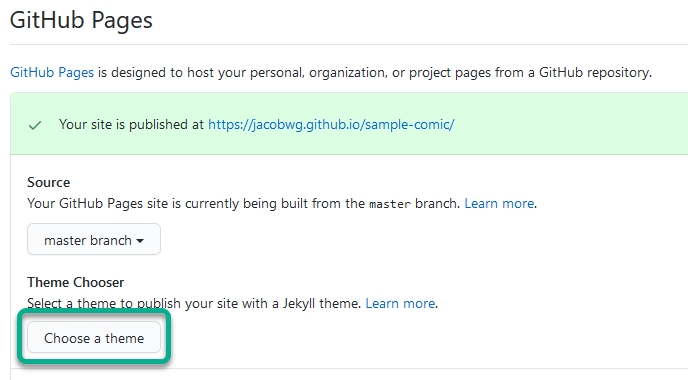
To let other websites access your feed.xml file, you need to set a Theme for your GitHub Page, in your GitHub repository settings, just beneath where you first enabled publishing your repository to GitHub Pages.
This choice is unrelated to the Theme you chose in the comic_info.ini file, if any. It doesn't matter what theme you choose, as it is not used by comic_git, but for some weird reason GitHub Pages requires it anyways to properly serve your feed.xml file.
And you're done! Your RSS feed file will be created the next time you update your comic, and it will be kept automatically updated alongside your comic.
comic_git includes support for transcripts on every comic page! Just drop your transcript in the form of a *.txt file in your comic folder (except post.txt), and comic_git will load the transcripts element on your comic page beneath your text post. Multiple languages are supported, with the filename of each *.txt file showing up as a separate item in the transcripts list. The transcripts list on the comic page is sorted alphabetically.
For example, if you want to add an English transcript to your comic, you simply need to make a file named English.txt in the comic folder that contains the transcript text, and it will show up on the comic page when your website is built.
For more options, like disabling transcripts, changing the transcripts folder, and the default language, see the Editing your Comic Info page.
One frequently requested feature is the ability to support multiple comics on one website. comic_git supports that with the "Extra Comics" feature! This can be used for hosting your main comic and side comics, or even setting up things like a fanart galley. An "extra comic" will function exactly like the main comic, with all the same features available for you to make use of. It can be themed, designed, and managed completely independently from your main comic, while still hosted in the same repository.
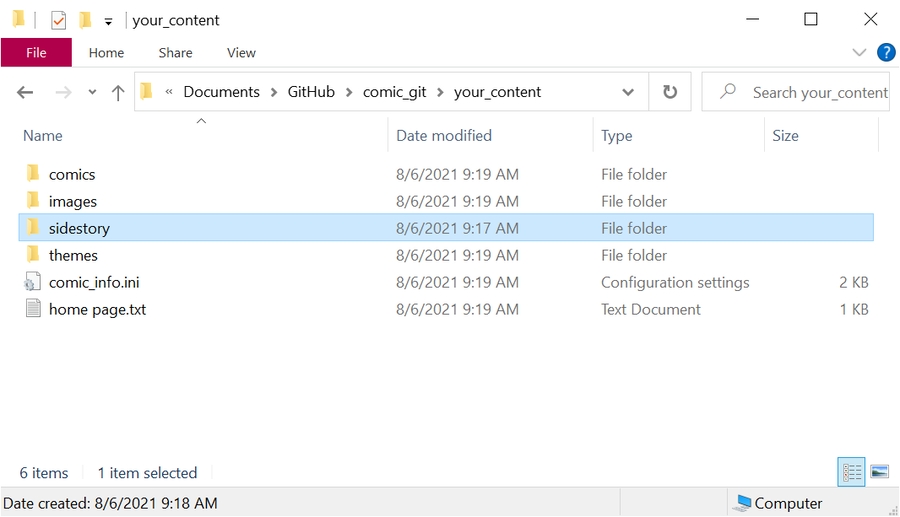
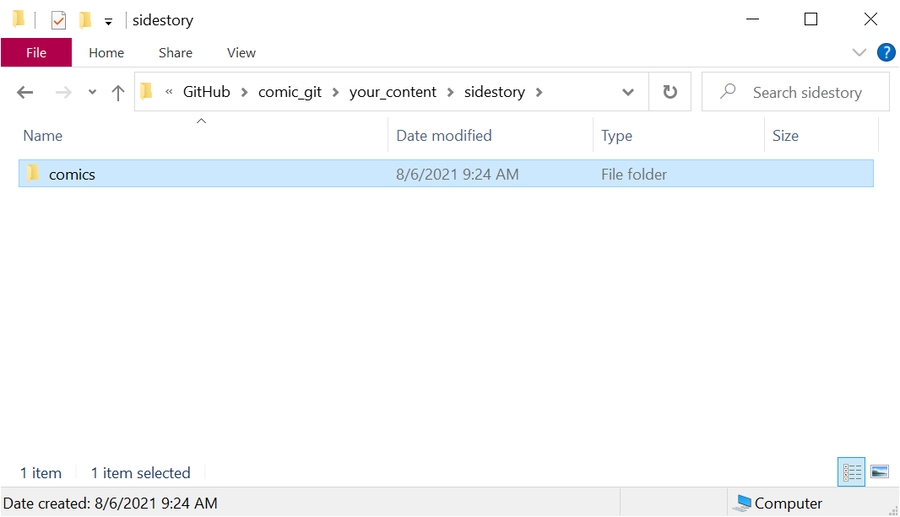
To create an extra comic, the first thing you'll want to do is create the folder for your extra comic in the your_content directory. You can name this folder whatever you want, but keep in mind that the name will define what the URL for your extra comic will be.
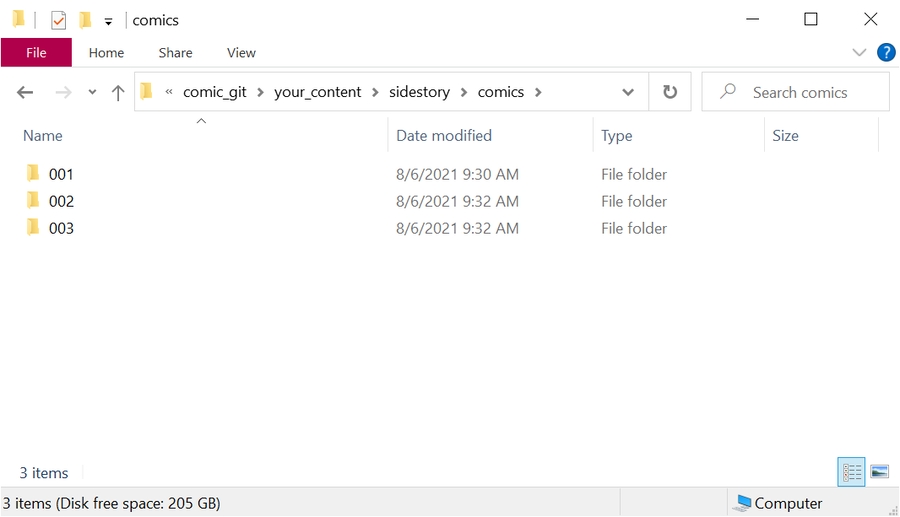
Then, create a comics folder within that directory.
Then, create the individual comics folders within comics as described in Adding Comic Pages
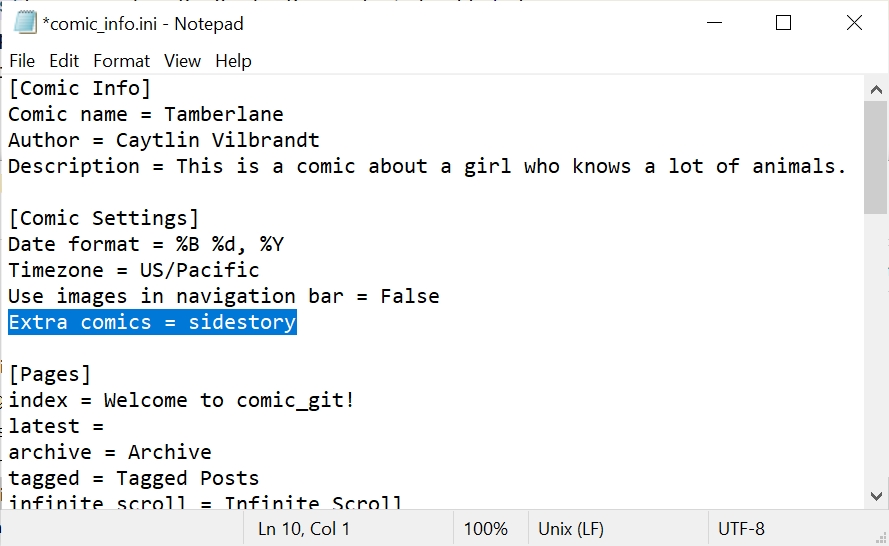
Last, open up the your_content/comic_info.ini file and add the "Extra comics" option under [Comic Settings]. Set the value to the name of the folder you created in the first step. This is case-sensitive, so be sure not to add random capital letters.
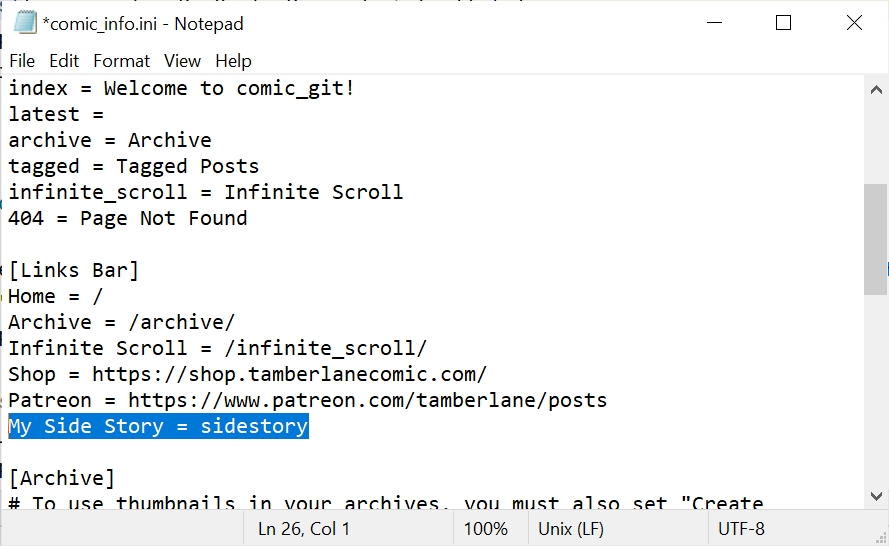
You may also want to add a link to your extra comic from the links bar.
And you're done! Push your changes to GitHub, and your extra comic will be available to browse!
To start with, the only pages published for your extra comic are the comic pages themselves. No home page, no archive page, etc. That means when you link to your extra comic, you'll want to link directly to the comic pages. So, for example, linking to the first page in the extra comic in the images above would be /sidestory/comic/001 or http://<your username>.github.io/<your repo name>/sidestory/comic/001/#comic-page.
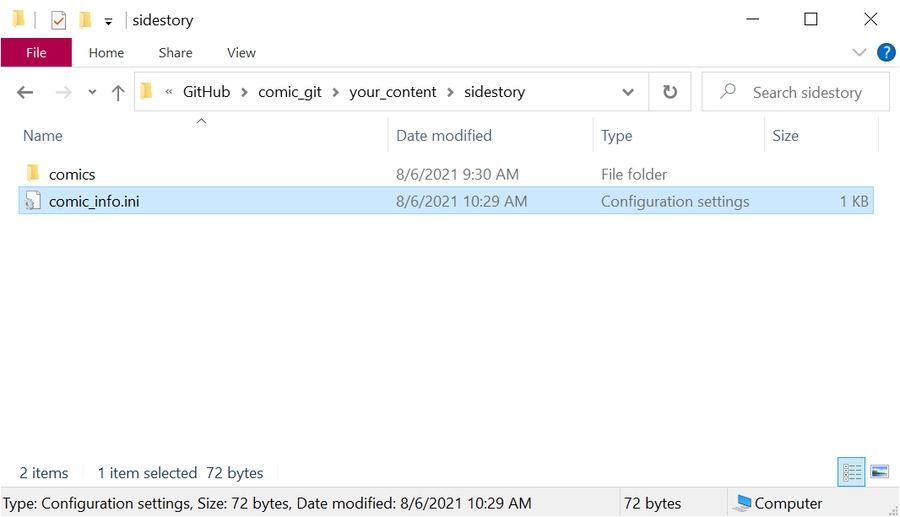
One of the first things you'll probably want to do is add a home page to your extra comic, and possibly an archive page as well, so people can browse it just like your main comic. To do that, you'll need to add a comic_info.ini file to your extra comics folder. If you like, you can copy the comic_info.ini file from your main comic into this folder to start.
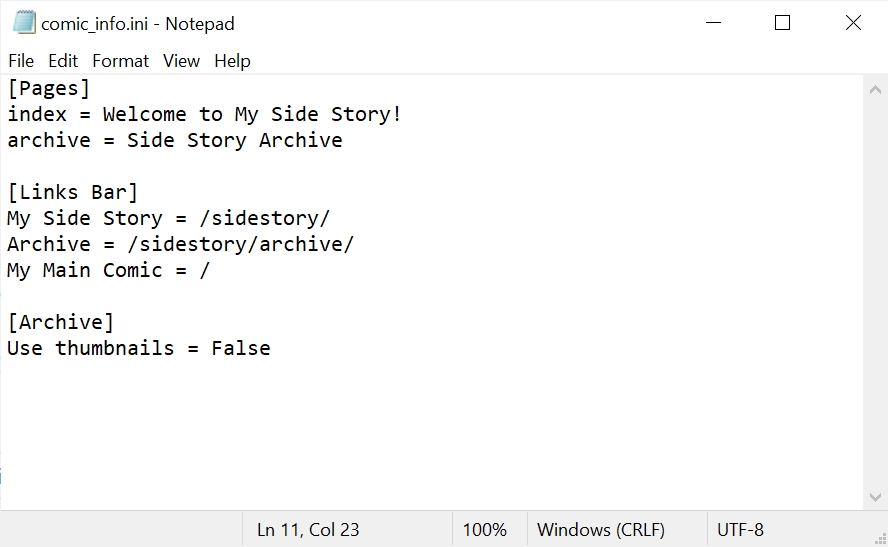
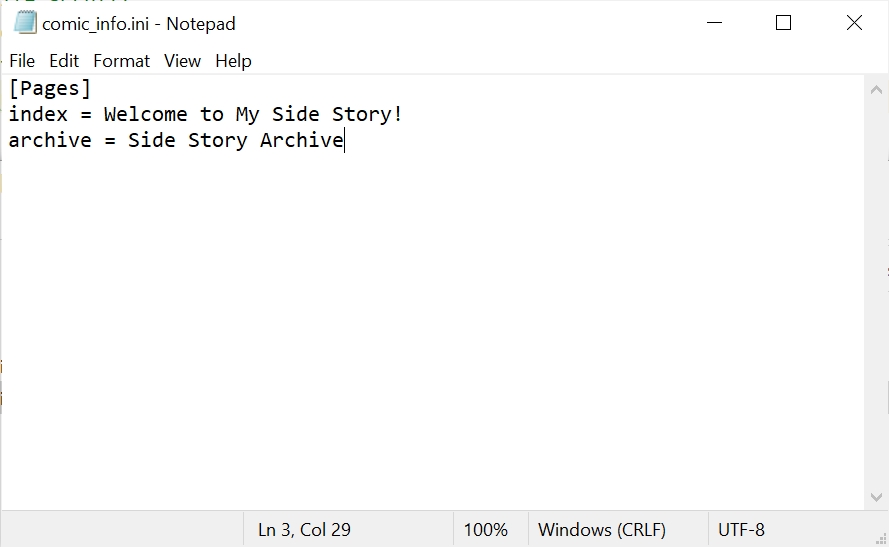
Next, open up the comic_info.ini file in a text editor and add a [Pages] section, along with the pages you want your extra comic to support. See the Pages section of Editing your Comic Info for more information on this section.
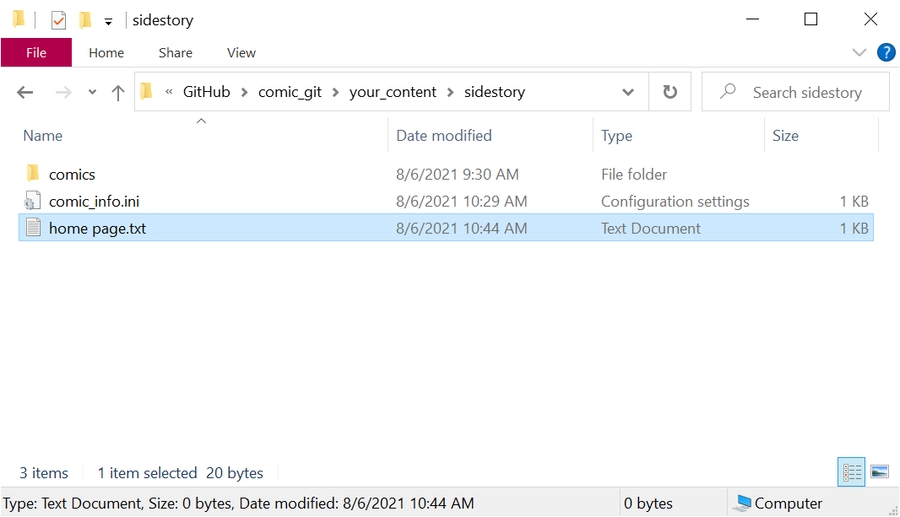
If you're adding an index page, like in the above example, and you're still using the default index.tpl that comes with comic_git, you'll need to put a home page.txt file in your extra comic folder as well, just like your main comic.
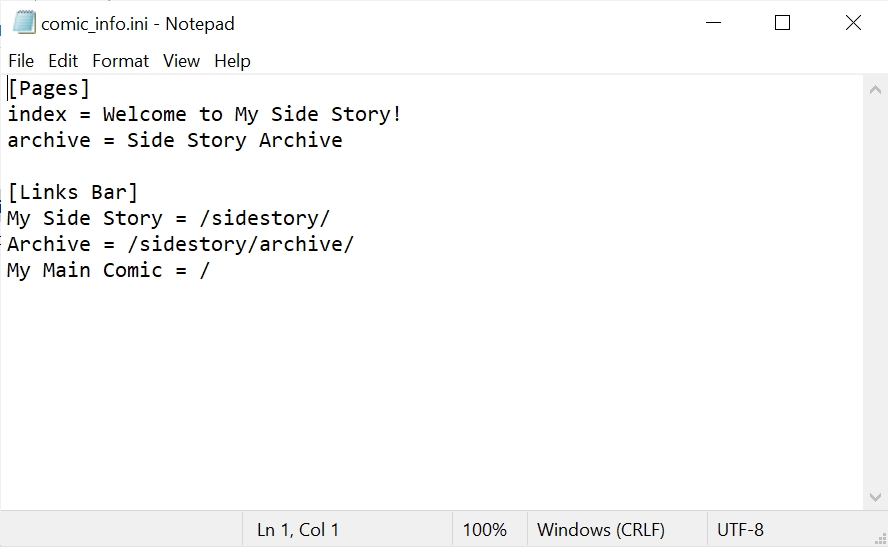
You may have noticed at this point that the Links Bar above your comic but below the comic banner is the same as on your main website. You may want a links bar that's unique for your extra comic. If you do, setting that up is easy. Just edit the comic_info.ini file for your extra comic to have its own Links Bar section.
All links are relative to your whole website, so to link to pages in your extra comic, you will need to start the link using the extra comic's directory name.
By default, your extra comics inherit all the settings from your main comic. This includes all the settings found in the comic_info.ini file, like whether or not to use thumbnails for your archive page, the date formats, and your Google Analytics ID.
If you want to change any of these values for your extra comic, you just need to add that change to your extra comic's comic_info.ini file.
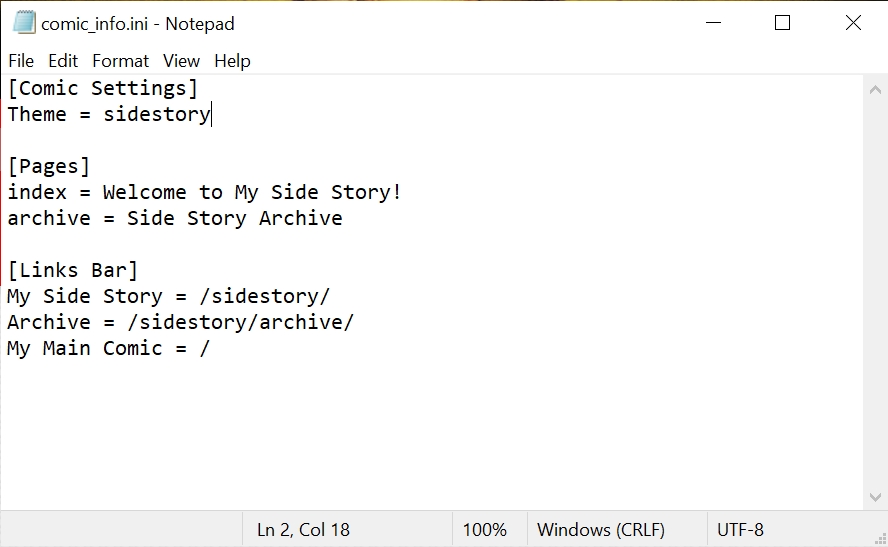
In addition to changing the comic_git specific settings of your extra comic, you may want to change things like the colors or font of your extra comic, to differentiate it from your main comic. To do so, you'll want to create a new Theme, and then assign that theme to your extra comic in the comic_info.ini file.
comic_git supports multiple extra comics! Just create multiple folders, one for each extra comic, as described in this section. Then add all the folder names to the "Extra comics" option in a comma separated list, like so: Extra comics = sidestory, backstory, fanart_gallery
The method of doing this is defined by the . comic_git provides some OGP data for every one of your pages by default. However, the one thing it can't automatically create for you is a preview image.
You can see an example of how the preview of your comic will be presented by plugging your URL into .
Language: The language your comic is written in, usually the two-letter code for your language. For example, "English" would be "en", or "United States English" for "en-US". See a list of acceptable language codes .
The most common way is to add a link in your Links Bar to the feed.xml file. The text can be simply RSS or a .
comic_git supports Google Analytics right out of the box! After you've signed up for and generated the tracking ID for your webpage (looks like this: UA-123456789-0), you just need to add it to the Tracking ID option in the [Google Analytics] section of your comic_info.ini file.
Don't know what Google Analytics is or how to use it? has you covered!
Transcript files support and HTML syntax.
